
Tracking your rankings in Google (and other search engines) is an essential part of search engine optimization.
It's likely that rankings isn't the ultimate goal of your SEO efforts; rather you'll be shooting for conversions and revenue. Nevertheless, keyword positions in Google are one of the best leading indicators that your efforts are working.
It also helps you assess where you're currently at, find opportunities, and decide where / what to work on next.
In this article, I'm going to lay out a couple of beginner-friendly methods to finding out how your website is ranking in Google (for desktop & mobile). I strongly recommend the first one (using a paid tool), and I'll explain why later. It doesn't need to be expensive at all, and it's the most effective by far.
Here's 3 methods to check your keyword rankings, in order of their effectiveness:
Use a paid tool to track your Google rankings
I'm going to start with this method because I believe it's the most effective, and it's the one I've always used for the past 6+ years.
There are countless rank tracking tools out there these days, with a really wide range of price points and features.
Here I'm going to assume that a) you're relatively new to search engine optimization, and b) you don't have a huge software budget for this.
With that in mind, I'm going to show you how to track keyword rankings using Nightwatch.
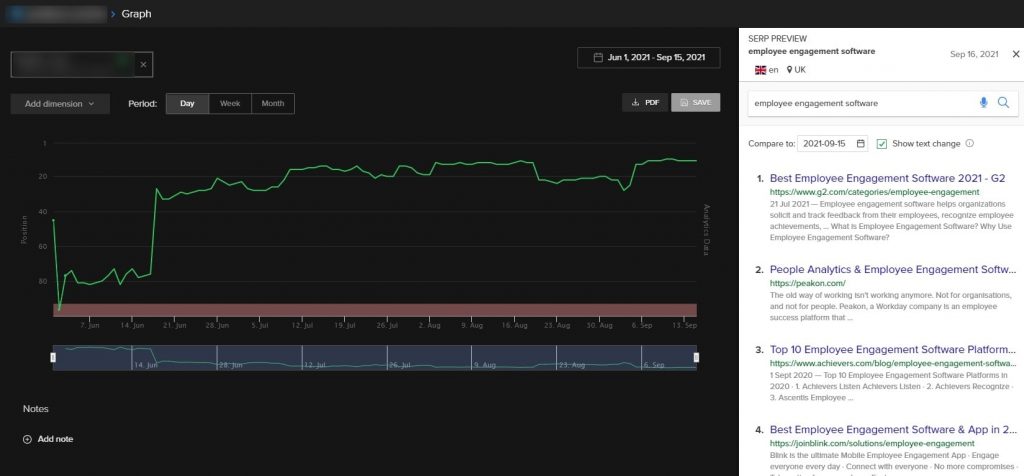
Nightwatch has an accessible / low starting price, the UI isn't too confusing or overwhelming, it's great for both localized and global tracking, and it works well whether you're tracking 50 keywords or 50,000.
Wincher is another beginner-friendly keyword tracking tool to consider. Whichever one you choose, the same general approach will apply.
Here's how to start tracking your keywords.
First, I'll take you through the actual setup process of signing up for the software, step by step.
Then, I'll give you a few tips & ideas on how to manage your rank tracking ongoing. Feel free to skip to that section if you prefer.
How to set up Nightwatch for keyword tracking, step by step
Step 1: start a free trial & add your website URL
Head to Nightwatch.io and start a free trial.
Once you're signed up, you should land on https://app.nightwatch.io/start/url to begin the setup.

Add your website URL, primary country, and language. If you want to track rankings in multiple countries, don't worry. You can do that later.
For local tracking, you can optionally add a Google My Business profile here too.
Tip: if you're new to rank tracking, I'd strongly suggest trying to book a demo. At the time of writing, Nightwatch are offering a 20-30 minute call to help you get up and running the right way and ask questions. This prompt comes after signing up:

Step 2: add your target keywords to track
Next, add some keywords. If your site has some existing rankings, Nightwatch will try to auto-suggest some options.
Don't worry about adding in a comprehensive list for now; throw a few ideas in and you can come back to this later.
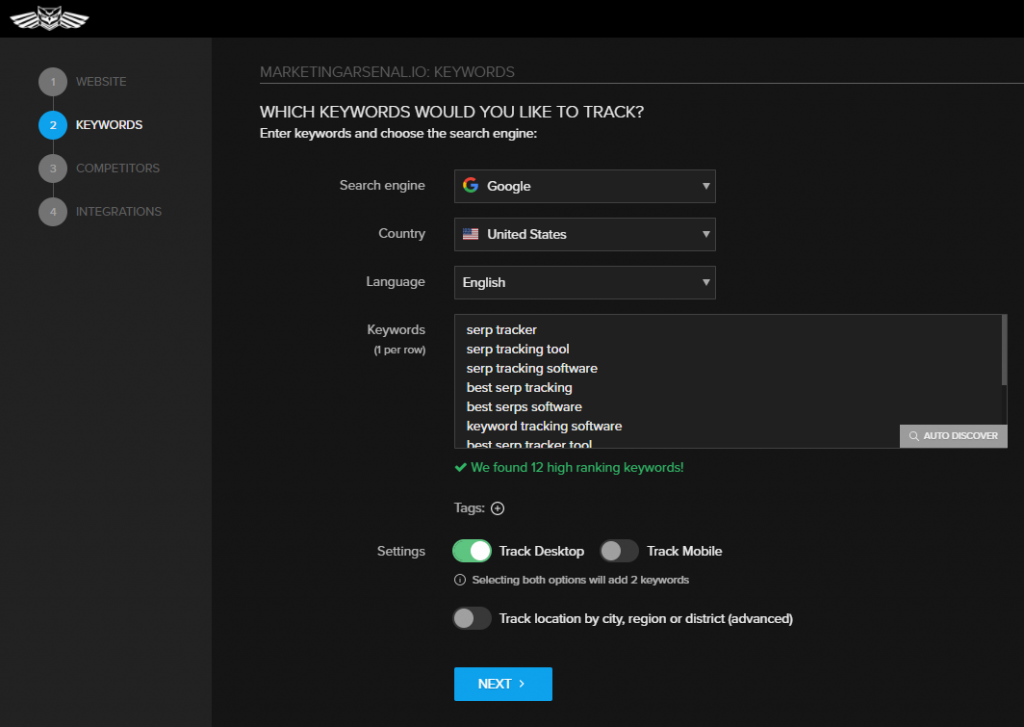
Here you'll also choose whether you want to track desktop rankings, mobile rankings, or both.
Lastly, if you're tracking local rankings, you can add a city, town or region for more accurate local results. Local rankings is something that Nightwatch excels in.
I've added some tips on choosing which keywords to track at the end.
Step 3: optionally, add competitor URLs to track
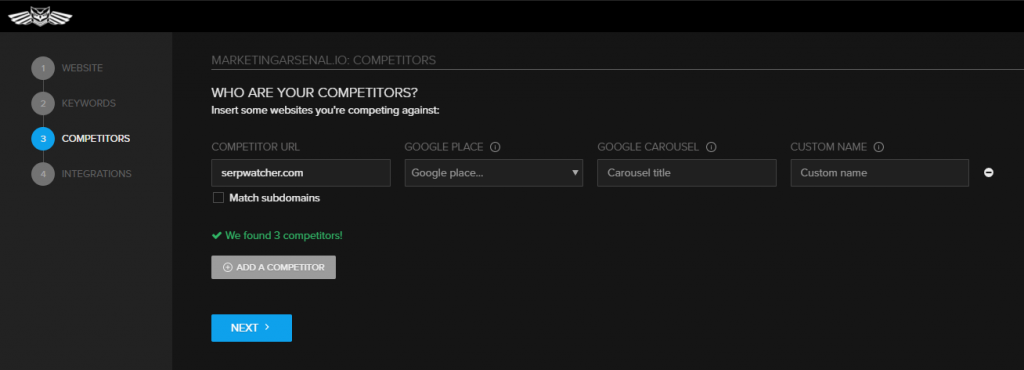
If you want to track your competitor's search rankings, you can do that here.
Once again, Nightwatch will try to autosuggest some options by finding sites which rank for similar keywords to you.
Step 4: optionally, connect your Analytics & Search Console data
This isn't required to track keyword positions, but I do recommend connecting the integration.
It only takes a few clicks if you already have Google Analytics & Google Search Console setup.
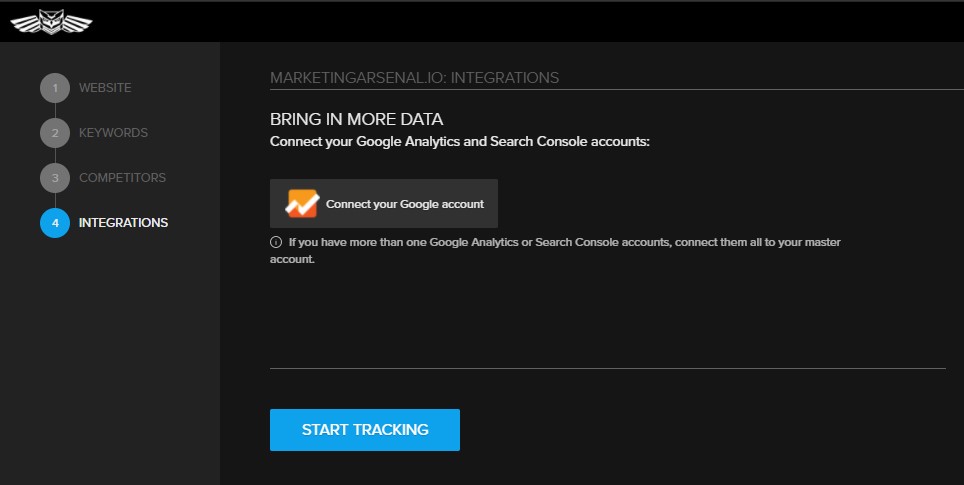
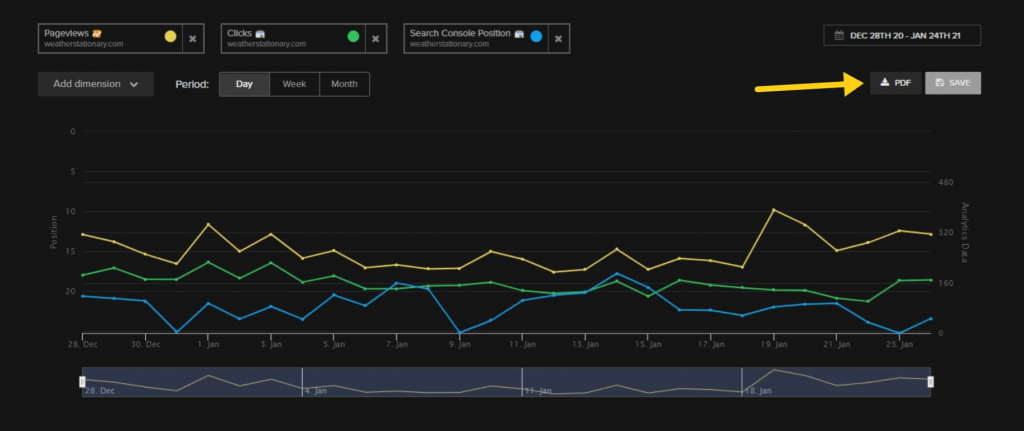
The key benefit here is that you can correlate ranking changes to actual traffic, which is helpful in reporting and analysis.
Nightwatch has a great easy-to-use graphs feature which lets you overlay different metrics, e.g. traffic with rankings together to visualize the impact. There's also an easy one-click export for each graph you build:
And that's pretty much it! You can go back and add more keywords any time, and the rank tracker will update automatically every day to check keyword positions.
If you're using a marketing dashboard tool like Google Data Studio or similar, you may also want to connect your rank tracking data there. That way, you can get an even closer view of how your rankings affect other KPIs.
Here's a few more tips to help you with managing your tracking.
Tips to manage your keyword tracking
1. Create new views & tags to segment data
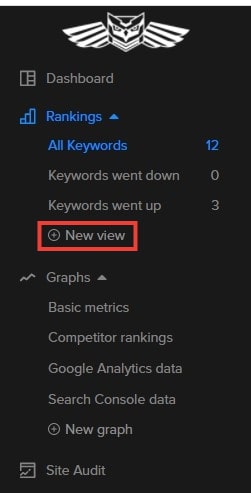
By default, along the left side of your sidebar in Nightwatch, you'll see some helpful views like ‘keywords that went up' (and down).
You can create more of these to quickly come back to filters that you look at the most. You can group your keywords based on pages, categories, themes, or whatever you want.
To do that, simply click on ‘new view':
Here are some ideas on views you could create to make your life easier:
- Separate blog posts from landing pages
- Group keywords by the product or service they're related to
- Separate brand & non-brand keywords
- Add a view for the priority keywords you're currently working on
- Group entire subfolders of your site, e.g. /shop/mens/ and /shop/womens/
And so on. You simply need to set up the filters (e.g. URL contains, tag contains, keyword contains, etc.), then hit ‘save' on your view. Then, after refreshing, the new views will appear in your sidebar so you can get back in one click.
2. Create automatically scheduled reports
I check my keyword rankings every single day religiously, but quite frankly it's a waste of time. Decisions aren't made based on one day's movement, but rather based on trends over a longer period.
It's probably a smarter move to get a summary of key movements on a weekly basis, and you can automate such a PDF report to come to your email at your desired frequency.
Nightwatch's report builder lets you add & customize various elements, but we'll focus on keyword movements here.
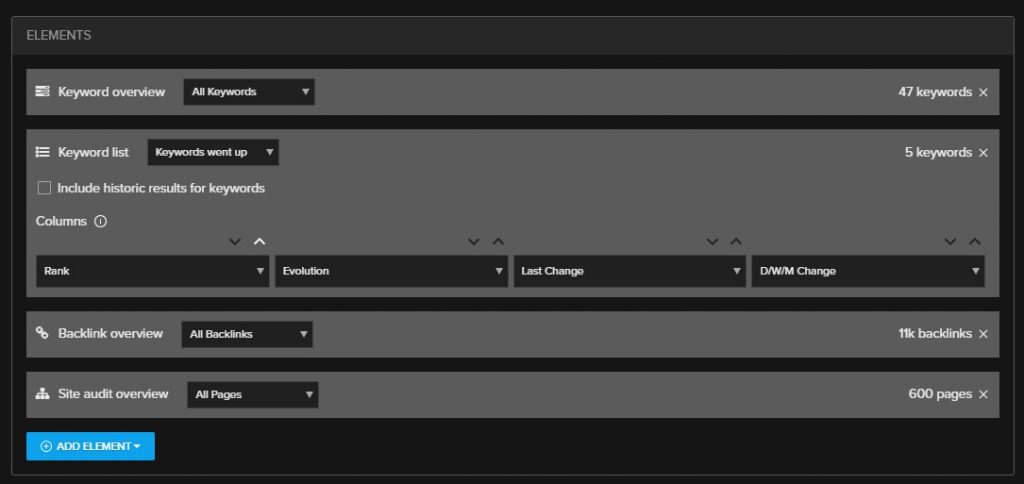
You can choose what to include in the report; such as specific views or keyword categories (see the previous tip), only keywords that went up or down, and so on.
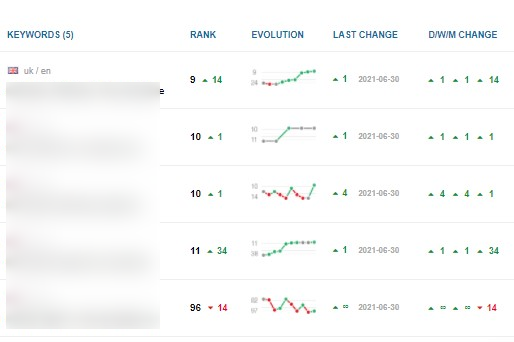
The exact columns can be customized too, but here's a quick glimpse / example of what you might end up with:
3. Customize your columns in the rankings dashboard
By default, your dashboard will show these columns, but they can be customized:
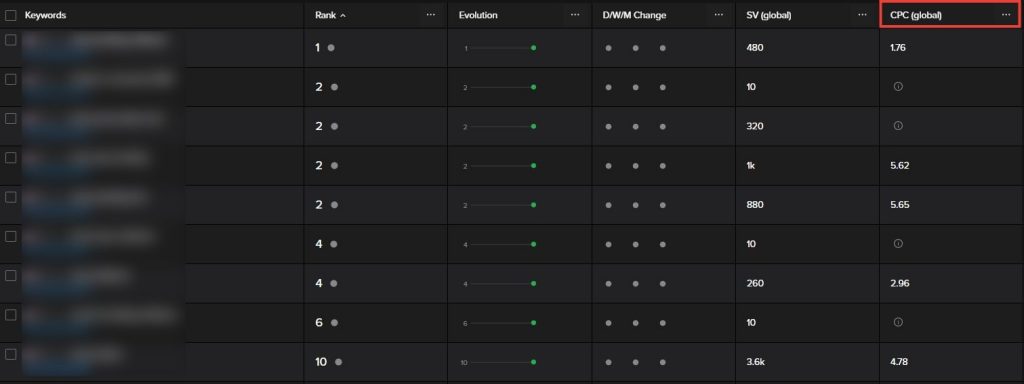
In particular, I don't find the estimated CPC to be very useful (highlighted in red above), so I like to change that column to either daily change or weekly change.
I'd encourage you to click on those 3 little dots at the top of the column and check out the options for what you can display. Some other good options include:
- Best ever rank for that keyword
- Daily actual clicks (from Search Console data)
- Search volumes (local or global)
- Tags
- Which URL is ranking for that keyword
That's all for this method! If you have absolutely zero budget for a software tool, then here's a couple of other workarounds.
Check your Search Console data
Google have a free tool called Google Search Console.
It helps you to learn about various aspects of your website's Google performance, including the keywords you're getting clicks & impressions from, and their average positions.
In case you haven't already, you'll first need to verify ownership of your site. See instructions here. After that…
Step 1: visit the Search Console and click ‘performance'
Visit https://search.google.com/search-console, and you should see your site's data dashboard that looks like this:
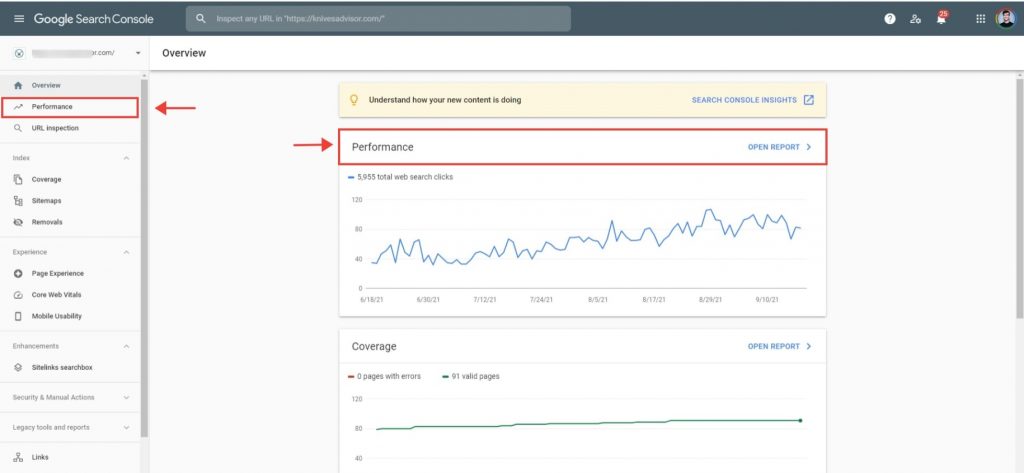
Click into ‘Performance' in either of the areas highlighted in red above.
Step 2: toggle ‘positions' data on
You'll land on a screen that looks something like this.
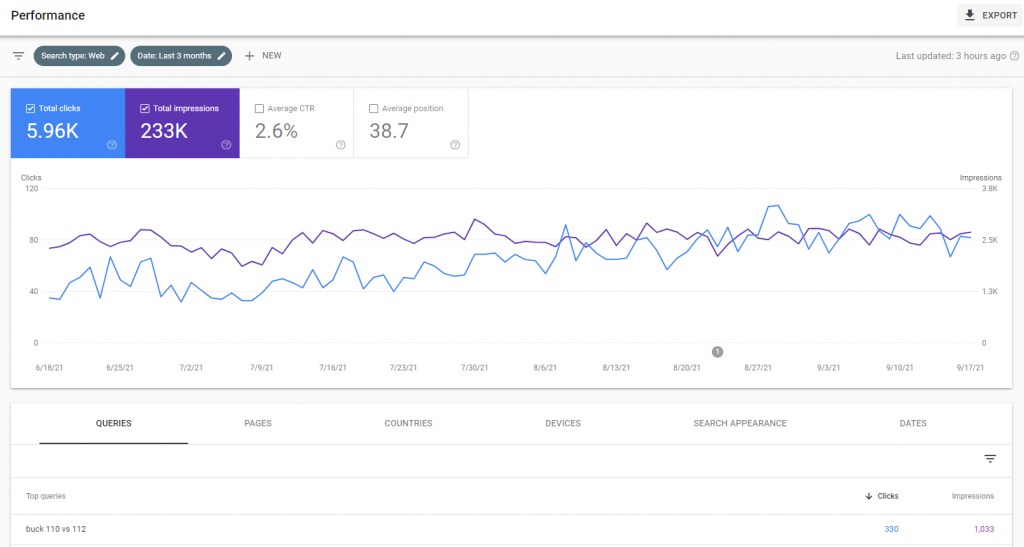
Here, you can see clicks & impressions for your site overall. Now we just need to add in positions data.
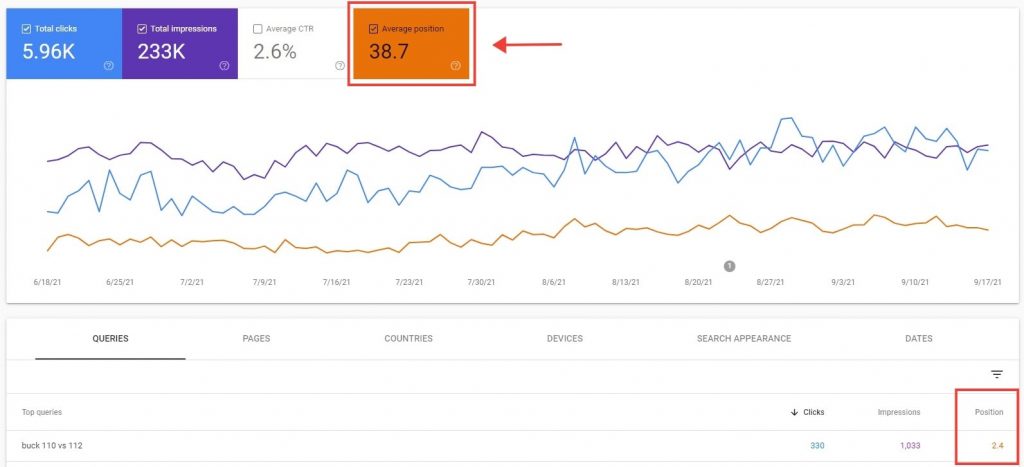
Click on the box that says ‘average position' shown by the arrow above. It will turn orange, and an additional column for positions data will appear in the queries report below (see bottom-right).
Step 3: explore & filter your data
That's it! Now you can access average positions data for any keyword that your site is currently ranking for in Google.
The next thing to do is explore & add some filters. Here's some things you can try:
- Just scroll down, and check all your keywords one by one
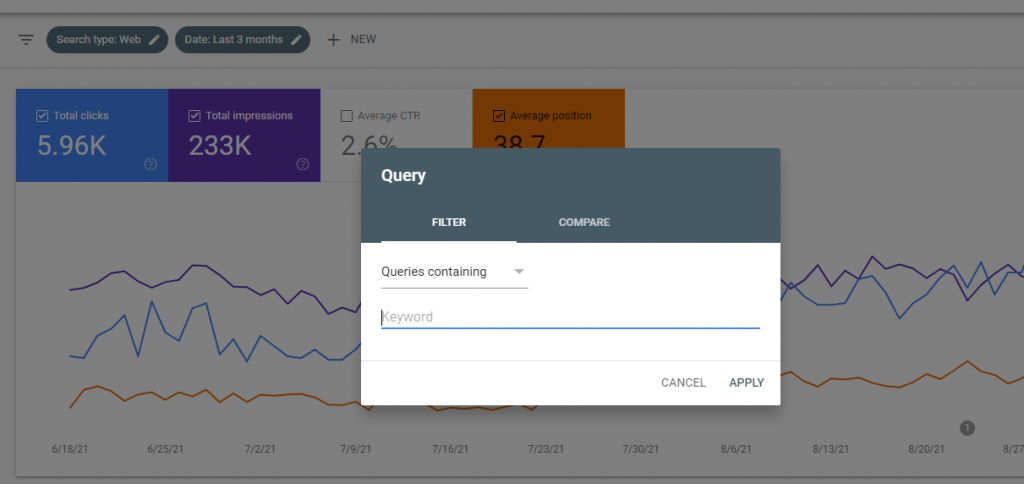
- Add filters, e.g. ‘keyword contains'
- Check by page, by country, or by device
Limitations of tracking Google rankings with Search Console
If you have no budget for rank tracking, then this is a really great free way to check your keyword positions. That being said, it does have limitations, and I would never choose to manage my SEO work without a dedicated rank tracking tool.
Here's a few high-level reasons for that:
- The Search Console anonymizes data for low-volume search terms, which leads to inaccuracies
- Positions are also only reported when there are impressions reported, which is another issue for lower volume queries
- Rankings can change very quickly, and the averages displayed in Search Console lags behind
- SERP features can't be easily tracked, e.g. you can't tell the difference between rank #1 and a featured snippet
- The UI is not as useful; you can't add tags and filters to analyze your data segments easily
There are some others, too. You can read more about the limitations of using the Search Console for rank tracking here.
Search manually to check your positions
If you want a quick and dirty way to check your position for a small number of keywords without buying a tool or even setting up the Search Console, you could try searching manually.
This isn't going to be anything groundbreaking, but basically:
Step 1: open an incognito browser window
In Google Chrome, a private browsing window is known as Incognito. You can open a tab with ctrl/cmd + shift + N.
If you don't use Chrome, there's an equivalent private window in other browsers, e.g. Private Window in Firefox or Safari.
This will help to limit how much the SERP you see will be personalized based on your browsing activity etc.
Step 2: search for your target keyword
Fairly straightforward. Make your search, and check for your results.
If your site isn't ranking on the first page, the quickest way to find your position is to change your search settings to show 100 results instead of 10:

You can access that setting by clicking the gear icon near the top-right corner.
Once you've done that, hit ctrl/cmd + f and type your domain to find it quickly.
Tip: after your search, try adding ‘&pws=0' to the end of the URL you land on. This extension forces any personalization to be removed.
And… well, that's it. There isn't a quick way, outside of counting, to determine the exact position once you find your site in the SERPs. And you'll need to start the process again to check another keyword.
Limitations of this method
This is the weakest method, and really isn't a viable long-term strategy at all.
Obviously, the biggest limitation is that you just find out your position one time, and that could be wrong again within an hour.
No history, graphs, movement over time, no reporting, and so on.
In addition though, it's simply not as accurate. You can try to limit the personalization and geographical changes to the search results that you see, but at the end of the day, the SERP that you see can still be quite different to that of someone in another country or city.
Which keywords should you track on Google?
This is going to change a lot depending on your site, your niche, business model, and what you're currently working on.
To get started quickly, you can add things like:
- Branded search terms
- Search terms you think people might use to find your main products/services
In addition, head into your Search Console account. Find out which keywords you're currently getting clicks & impressions for. If you want to see increases in those, start tracking them.
To take this up a notch, you need to do keyword research. I have a separate post dedicated to ways to find keywords for SEO, but some quick ideas to consider:
- High intent topics like ‘best xyz' or ‘xyz alternatives'
- Any potential ‘how to' questions you could create blog content for
- Competitor comparisons (brand X vs brand Y)
Combining a paid keyword research tool with your own data (e.g. Search Console, PPC) & market knowledge will lead you to the right keywords to use.
FAQs about tracking Google rankings
How do I see keyword rankings in Google Analytics?
The short answer is that you can't easily do that with accuracy anymore.
After you connect your Search Console data with Google Analytics, in the Queries report, you can start seeing the average position per URL. That's not a very useful number, as tonnes of secondary queries that you're not trying to rank for (but still getting impressions for) will skew the data.
What is a keyword rank tracker?
A keyword rank tracker is a software tool that helps you keep tabs on where your website is showing up in search engines.
It tells you which positions your website ranks in for various search terms. Keyword rank trackers can also help you understand how you rank in different countries or regions, and on different device types.
